Research, size, and open a position
The mechanics of actually LPing. Finding and researching a pool, impermanent loss properly explained, swapping on other DEXs, opening and managing a position on DELTRA, the three shapes, and how LPs actually profit.
Module 2.1~12 min
Finding and researching a pool
Course 1 told you what a pool is. This topic is what to do before you put money into one, in the order that actually catches problems, using DELTRA's own tools plus one outside check.
- In this topic
- pull up every pool DELTRA lists for a given coin, not just the first one
- explain why two pools on the same pair can pay completely different rates
- use DELTRA's pool list and the lp-scans bot to compare them
Most people find a pool by typing a ticker into a search bar and clicking whatever loads first. On Robinhood Chain that habit costs money, because the same coin can sit in four or five different pools at once, and the one that loads first is rarely the one paying the best rate.
Where to look for them
Start on DexScreener or GMGN's trending tab, filter it down, then sort by 5-minute or 1-hour volume. From there, look for runners: coins actually pumping or pulling in real volume, not just sitting on a chart with nothing behind it.
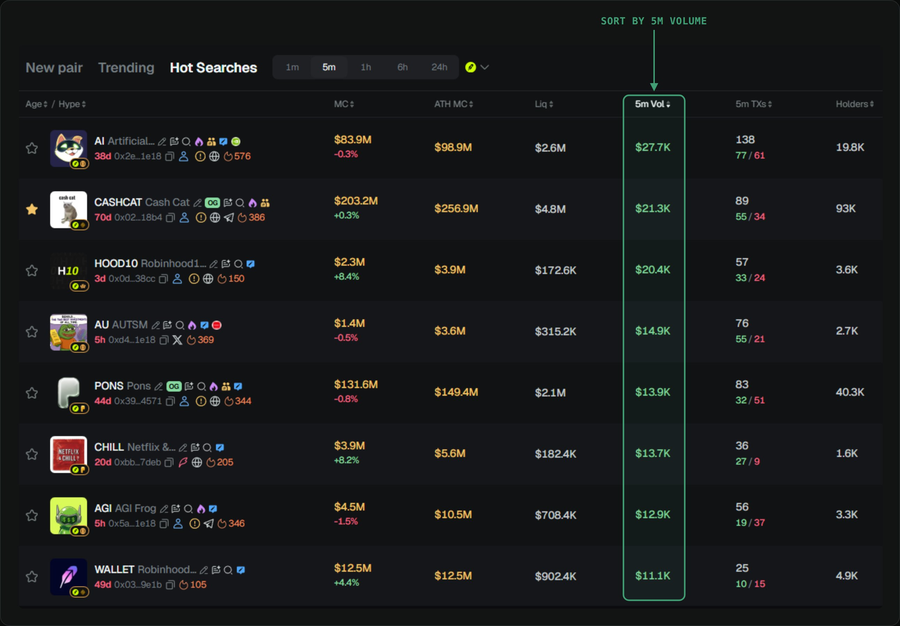
Not every coin with volume is worth LPing. Volume gets manipulated constantly, and a spike can just be the setup for a rug. Do your own diligence before you put money into a pool against one, or you lose it, simple as that.
Why two pools on the same coin pay differently
A pool is one specific contract: one fee tier, one Uniswap version, its own reserves. A coin can have a 0.05% pool, a 0.3% pool and a 1% pool running at the same time against the same ETH or USDG, and they are not the same trade. One might hold $2,030,000 of TVL and pay out $76,400 in fees over 24 hours. Another, same coin, might hold $2,910,000 and pay out only $65,070. The bigger pool made less money for its LPs. Divide fees by TVL and you get 3.76% a day against 2.24% a day. Traders picked the lower-fee pool for most of their volume, so that's where the money is, even though it looks like the smaller pool on a market cap chart.
That's the number that matters: 24h fees divided by TVL, the daily rate a dollar of liquidity earned. A pool can have a huge TVL number and still be a worse place to put your money than a pool a tenth its size, if the smaller one is where the trading is happening.
The order to check, every time
- confirm the contract address against what the project itself posted, not just what a search result shows first
- open deltaliquidity.app/pools and search the coin or paste the contract address, so you see every pool that exists for it, not just one
- for each pool, write down the fee tier, TVL, 24h volume and 24h fees
- divide fees by TVL for each one. That's the daily rate. Ignore anything labeled as an annualized percentage until you've done this division yourself
- paste the contract address into the bot in the DELTRA Discord's lp-scans channel. It returns market cap, total liquidity, volume and holders for the coin, then a row per pool: fee tier, TVL, 24h fees, 5-minute volume and a rate estimate
- cross-check on Dexscreener for anything DELTRA doesn't list yet. DELTRA shows pools that already exist on chain. It doesn't create them, so a brand new pool can take a little time to show up
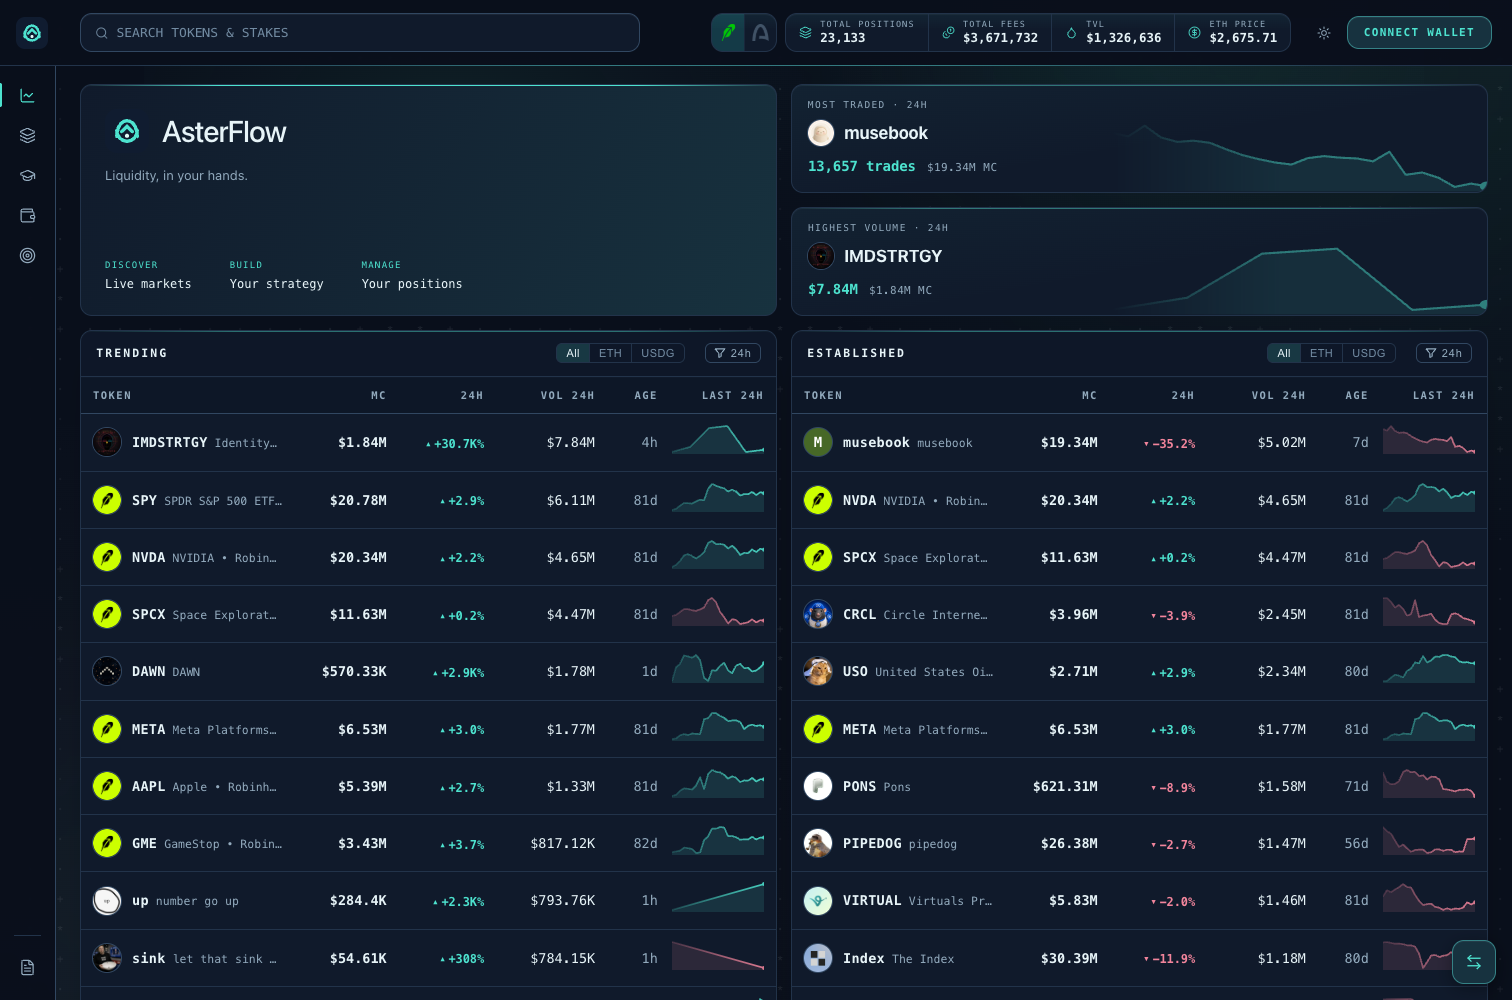
DELTRA's pool list is the fastest way to see fee tier, TVL and 24h fees side by side for every pool on a pair, which is the whole comparison in one screen. The lp-scans bot adds the same numbers plus a 5-minute volume figure, useful for telling whether a pool's daily number is a habit or something that happened once yesterday and stopped.
What decides which pool to pick
Higher fee tier does not mean higher pay. A 1% pool sitting mostly empty because traders route around it pays nothing. A 0.05% pool carrying most of the coin's real volume pays more per dollar than a 1% pool with a tenth of the traffic, and the fees-over-TVL division from the last section is the only way to see that before you deposit.
Size matters on top of rate. A $50,000 deposit into a $60,000 pool doesn't earn the rate the pool showed yesterday, because your own money changes the denominator. Redo the fees-over-TVL division with your deposit added to the TVL side before you commit anything meaningful. On a small pool the difference between the headline rate and your actual rate can be large.
And check that the volume is real before trusting the fee number at all. A pool with $600 of 24h fees on 9 transactions is not the same kind of pool as one with $600 on 400 transactions. Dexscreener's buy and sell counts for the pair, next to the pool's own numbers, tell you whether a lot of people are trading it or one wallet is.
Module 2.2~20 min
Impermanent loss, properly
You've heard the phrase. This topic explains what it actually costs, in plain language, because it's the one risk in LPing you cannot afford to be fuzzy on.
- In this topic
- explain impermanent loss in plain language, with a real worked example
- explain when fees can offset it and when LPing beats just holding
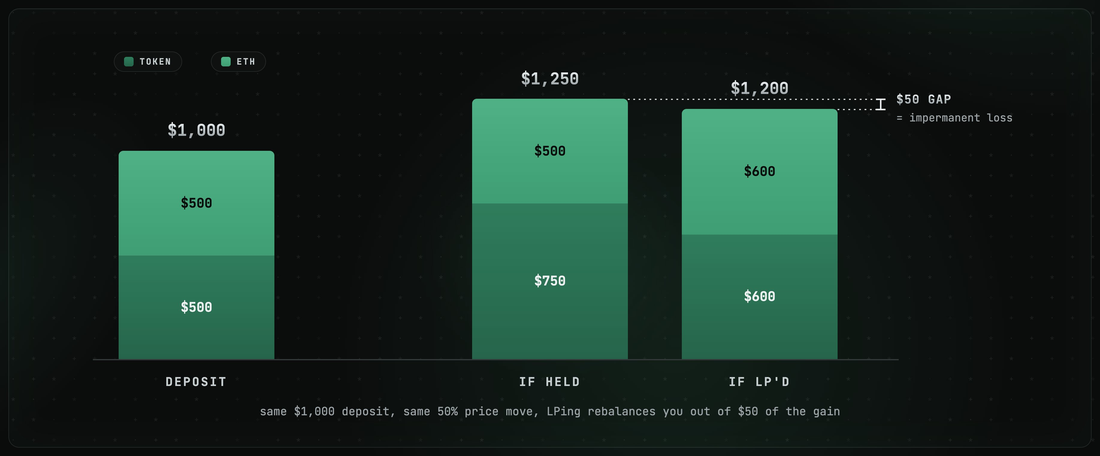
Impermanent loss is the concept most beginners get wrong, and it's the most important one to actually understand.
When you LP, you're exposed to both assets in the pool, not just the one you started with. If price moves heavily in either direction, the pool automatically sells one asset into the other to keep the ratio balanced. This is how AMMs work.
Say you deposit $500 of tokens and $500 of ETH, $1,000 total. The token then pumps 50%. If you'd just held both separately, your token bag would now be worth $750, plus your $500 of ETH, $1,250 total. However, because you LP'd, the pool sold some of your token into ETH on the way up to keep you balanced. This would result in you ending up with something closer to $600 in tokens and $600 in ETH, $1,200 total. You're still up, you just made $50 less than if you'd done nothing. That $50 gap is impermanent loss.
Compared to just holding, you end up with less of the winner and more of the loser every time the price moves. However, fees earned can offset this, but that is only if trading volume is high enough relative to how far price has moved.
The case where LPing wins is when the token ranges, because you keep earning fees in both directions. Topic 2.5 on the three position shapes walks through exactly why.
This is the version of impermanent loss to carry into every position you open, not a number to memorize but a mental model. Assume some of your gains get sold off if the token trends hard in one direction, and check whether the fees you're collecting are enough to make up for it before deciding a position is worth holding.
Module 2.3~12 min
Swapping on other DEXs
DELTRA builds positions, it doesn't sell you coins to LP them with. This topic covers three places to do that and how each one actually works.
- In this topic
- explain why an LP sometimes needs to swap before depositing rather than after
- describe what Uniswap, Matcha and KyberSwap each are and how the swap flow works on them
Why an LP ends up on a swap screen at all
Say you hold a stablecoin and want to open an ETH position. You need one specific asset in your wallet before DELTRA's builder will take it.
Uniswap
Uniswap is the AMM that DELTRA's own pools sit on top of, live on Robinhood Chain with v2, v3 and v4 all running. Using it directly is a plain swap: connect your wallet, pick the token you're selling and the token you want, and the app shows a quote, the rate, the fee tier the swap will route through, and the price impact your trade size causes. Review that quote, then confirm. Your wallet pops up asking you to sign, and once it confirms on chain you have the new asset. Uniswap is the one to reach for when you already know exactly which pool you want the swap to go through, since it's the same liquidity DELTRA itself builds positions on.
Matcha
Matcha is a swap aggregator, live on Robinhood Chain. Rather than routing you into one pool, an aggregator checks price across many pools and venues at once and splits or routes your trade to whichever combination gets you the best output. The flow looks almost identical to a plain DEX from your side: connect wallet, pick the tokens, review the quote, confirm. The difference is under the hood, where the aggregator is comparing multiple routes before it shows you one number. Worth checking when a pair might have several pools at different fee tiers or on different venues, since the best price for your specific trade size isn't always the pool with the most liquidity overall.
KyberSwap
KyberSwap is another aggregator, built the same way as Matcha in concept and also live on Robinhood Chain: it scans available liquidity and finds you a route, sometimes splitting one swap across several pools to reduce price impact on a larger trade. Connect, pick tokens, review the quote, confirm, same pattern again. The reason to have more than one aggregator open is simple: they don't always agree on the best route, and for anything beyond a small swap it costs nothing to check both before committing.
Reading the quote before you confirm
Whichever one you're using, three numbers matter before you sign. The rate, what you're getting per unit of what you're giving up. The fee, since every swap pays one, whether it's a flat pool fee or built into the quoted rate on an aggregator. And price impact, how much your own trade size is moving the price, which grows fast on a thin pool and barely registers on a deep one. A swap screen that shows a great rate but a large price impact number is telling you the trade is bigger than the liquidity underneath it wants to absorb quietly.
Module 2.4~20 min
Opening and managing a position on DELTRA
This is the full walkthrough. Every screen you'll click through to open a position, the three ways to size a deposit and what each risks, what you're signing when you submit, and DELTRA's partial-withdrawal feature, which lets you pull money out of a position without closing the whole thing.
- In this topic
- walk through every step of opening a position on DELTRA, in order
- compare the risk of a two-sided deposit against depositing just one side of the pair
- explain what you're confirming when you sign the transaction and what it costs
- use a partial withdrawal to take money out of a position without closing it
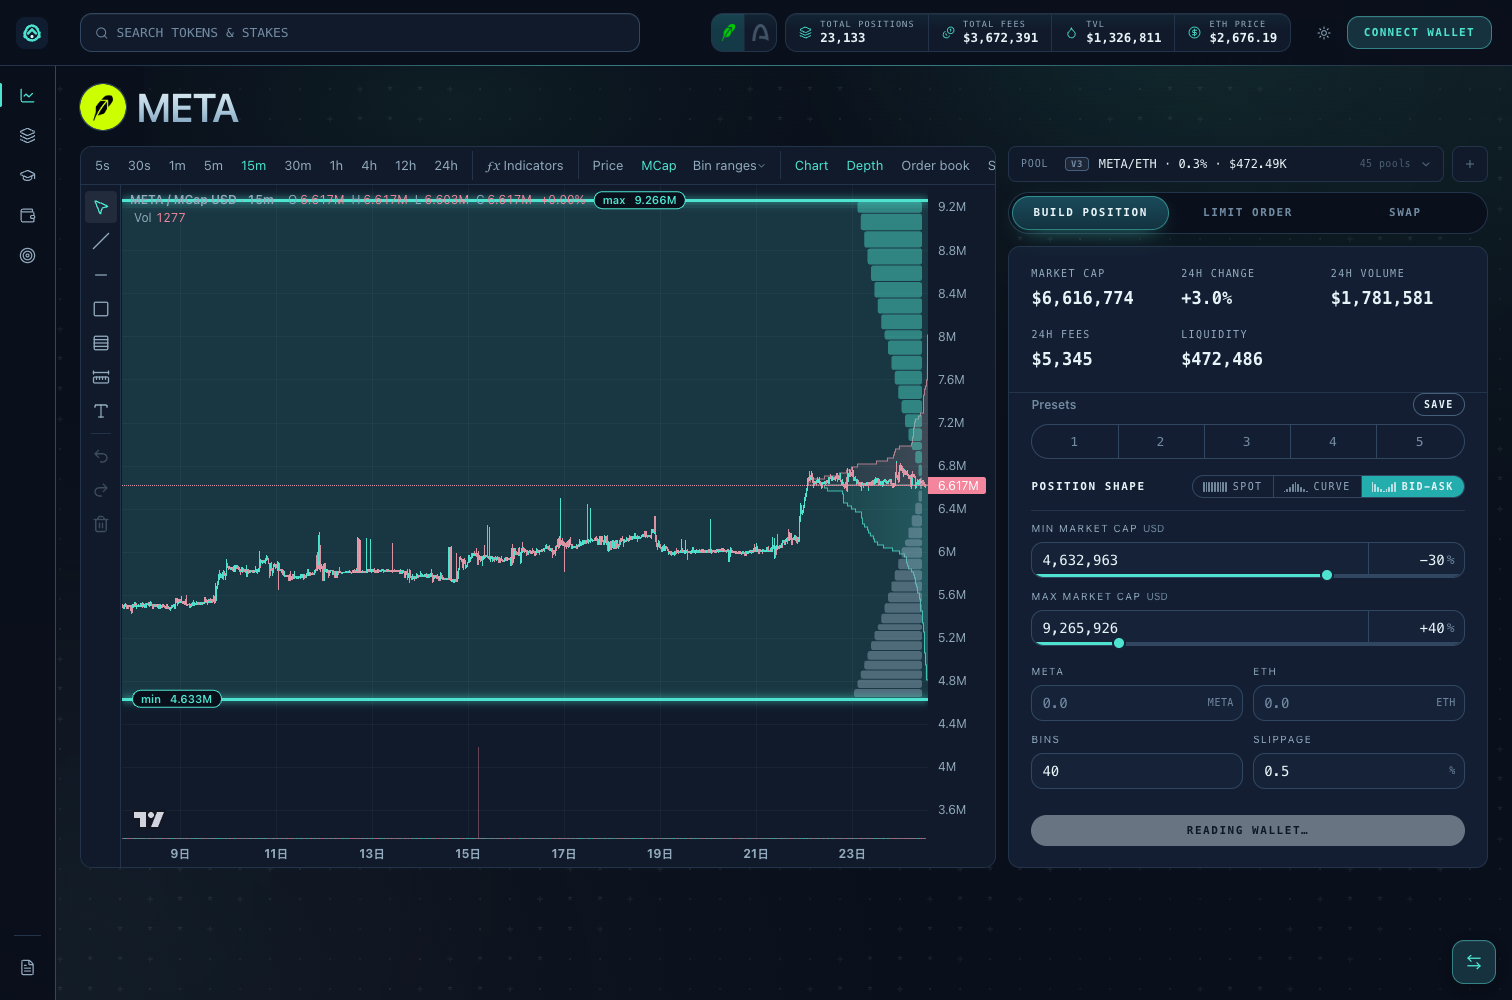
Once you've found the coin and know which pool you want, it's time to build the position. Opening one on DELTRA is one screen with four decisions: which pool, what shape, what range, how big. Get the order right and it takes two minutes; get it backwards and you'll redo fields already filled in.
Step 1: pick the pool
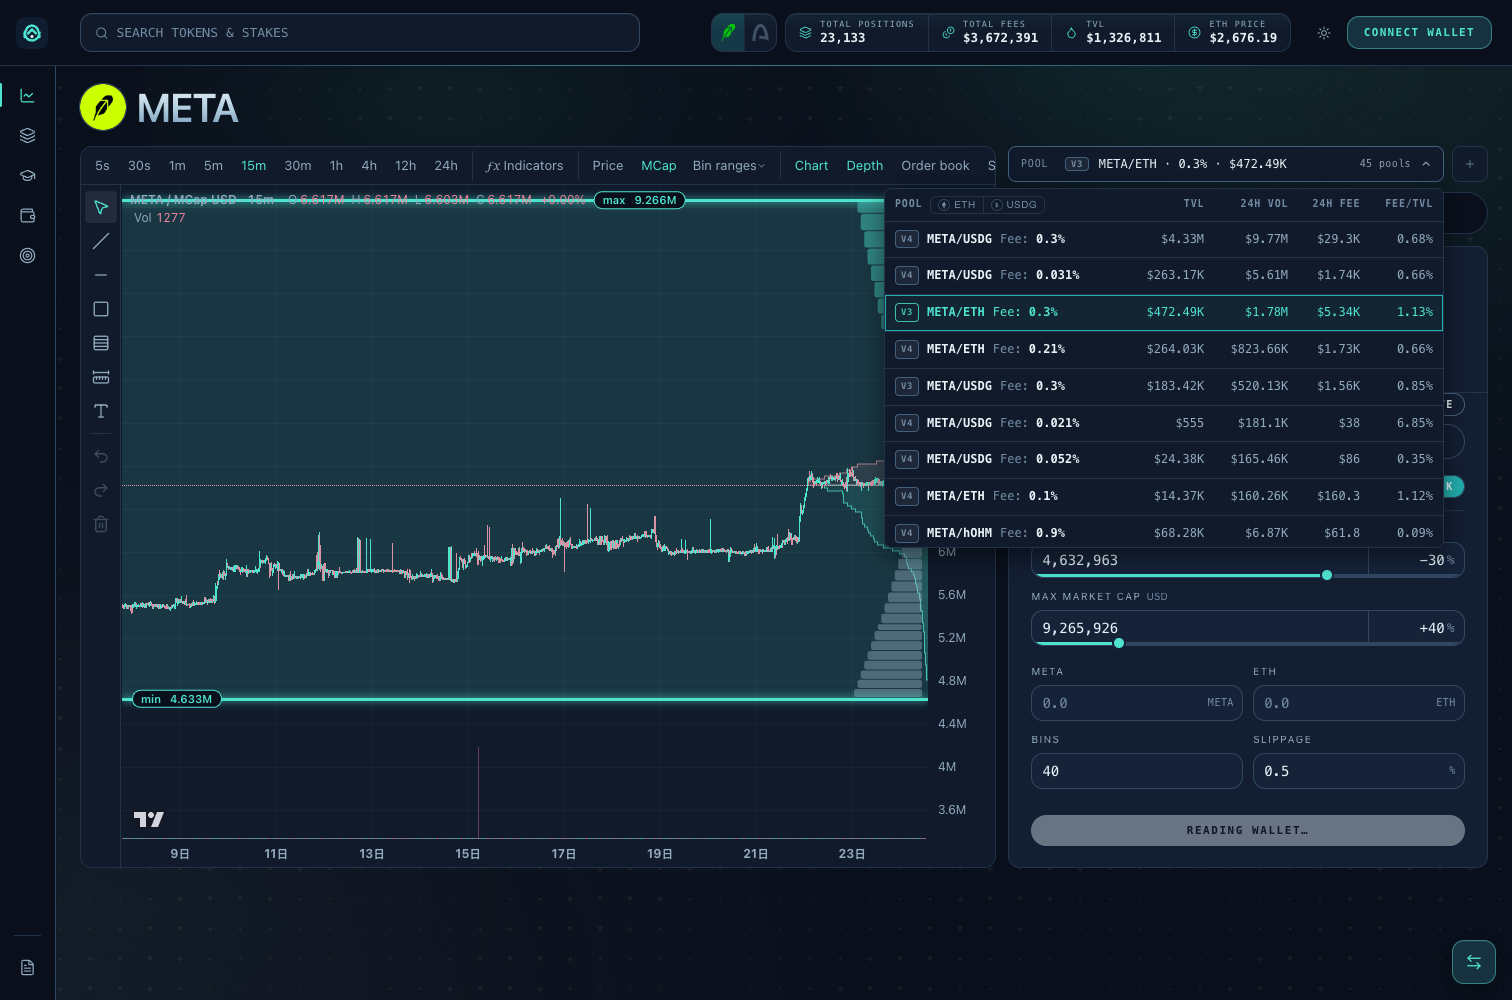
Start from deltaliquidity.app/pools. If you've done the research earlier in this course, you know the specific pool, fee tier included, you're after. Its page shows every Uniswap pool for the pair, grouped by fee tier. Pick the one you researched, not the top row.
Step 2: pick a shape
Spot, Curve or Bid-Ask, covered in full in the next topic. If you're not sure yet, Spot has no opinion baked in: even liquidity across the whole range, a reasonable default while you're still learning the others.
Step 3: set the range
Type a minimum and maximum price, drag them on the chart, or flip the toggle to set the range as market cap instead. A wide range earns less per dollar but covers more movement; a narrow one earns more but gets left behind faster. It depends how much you expect the coin to move and how often you'll check on it.
Step 4: set bins and size
Bins slice your range into that many positions, up to 40. Each is a real mint on chain, so each costs gas that doesn't come back when you close. Spot with no reason to want more: bins set to 1 gets the same curve as 40, for a fraction of the gas. Bid-Ask needs more to form a real ladder, 8 to 15 is usually enough.
Sizing is two fields, one per asset, and what you put in each is a real decision, not just what's available. Pools want native ETH, not wrapped, so unwrap first if your wallet shows none.
There are three ways to deposit into a pool
Each shape carries a different risk.
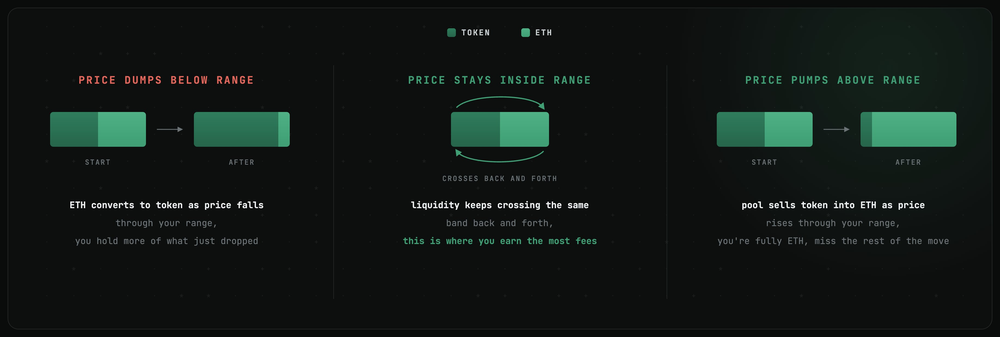
Two-sided, token and ETH: deposit both and pick the range you expect the token to trade in. Dump below it and your ETH converts into the token as price falls through, so you hold more of what dropped. Pump above it and the pool sells your token into ETH, so you're fully in ETH and miss the rest of the move. If the token ranges and stays inside your band, this is where you earn the most fees.
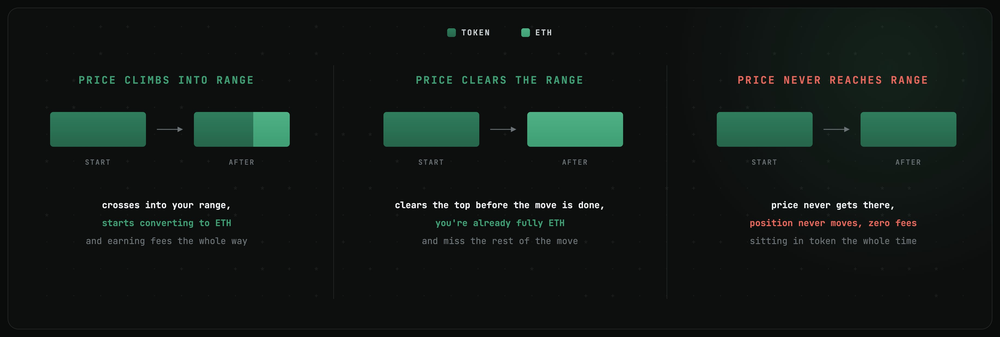
One-sided, token only: deposit just the token, range above the current price. You earn fees once price rises into it, but pump straight through and you've already converted into ETH before it clears, missing the rest of the move. Price that never reaches your range earns nothing, you're just sitting in the token.
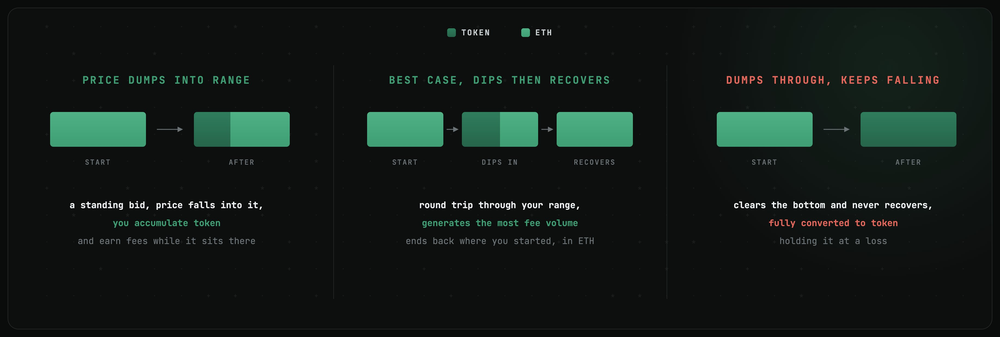
One-sided, ETH only: deposit just ETH, range set below the current price, a standing bid. Price dumping into your range means you accumulate the token and earn fees while it sits there. Best case is a dip that recovers, real fee volume on the round trip. Worst case it dumps through and keeps falling, leaving you holding the token at a loss.
There's no golden rule here. It depends on what you think the token does next, and that's the actual skill in LPing, not clicking deposit. Give yourself time watching charts before you size up.
Step 5: review and submit
The preview shows your final token split, bin count and what you're depositing.
Submitting is one transaction that mints your bins into a DELTRA contract holding the position, not your wallet; only the depositing wallet can claim or close it. You won't see it as a token in your wallet, which is expected. What you're confirming: tokens leaving your wallet, bins created on chain, gas paid in ETH per bin, roughly one swap's worth per bin.
Living with an open position
Once open, three things you can do without closing anything: claim fees, add more liquidity, or make a partial withdrawal. Claiming pulls accrued fees out and leaves the position running as it was, minus DELTRA's 1% cut.
A partial withdrawal works bin by bin: pick which of your position's bins to pull out, and the rest stay open under the same range and shape, still earning.
Module 2.5~12 min
The three shapes
Every DELTRA position asks you to pick a shape. This topic explains what Spot, Curve and Bid-Ask actually do to your liquidity, adds one-sided versus two-sided on top, and gives you a simple rule for picking between them.
- In this topic
- explain Spot, Curve and Bid-Ask using bid, ask and spread language
- tell a one-sided position from a two-sided one and say what each holds
- pick a shape from a simple rule of thumb rather than a guess
A shape is just how your liquidity is spread across the range you set. Same range, same deposit, same pool, and the shape decides where inside that range your money is doing the work.
Spot: even, no opinion
Spot spreads your liquidity evenly from the bottom of the range to the top. Think of it as a flat wall of both bid and ask sitting at every price in the range, all the same size. Whichever price the market sits at, you're earning at the same rate you'd earn anywhere else in the range. It's the shape for when you genuinely don't know where inside your range price is going to spend its time and don't want to bet on it. That's a real, defensible position, not a lack of one.
Curve: piled up around today's price
Curve stacks most of your liquidity near the current price and tapers off toward the edges of the range. It's a concentrated bid and ask sitting right where trading is happening right now, with less further out. While price stays close to where it was when you opened the position, Curve earns more per dollar than Spot, because more of your liquidity is exactly where the trades are crossing. The cost shows up the moment price moves: because so much of your liquidity sat at the center, a move away from it converts a large share of your deposit fast, and by the time price reaches the edge of the range, Curve has paid the worst average price of the three shapes for whatever it ended up holding. Curve is a bet that price stays roughly where it is.
Bid-Ask: piled up at the edges
Bid-Ask does the opposite of Curve. It puts the least liquidity at the current price and the most at the far edges of the range, like a market maker's resting bid and ask sitting well away from the last trade, waiting for price to travel to them. While price sits still near where you opened, Bid-Ask earns almost nothing, because almost none of your liquidity is where the trading is. When price actually moves and reaches those edges, that's where the bulk of your liquidity finally goes to work. Bid-Ask is a bet on movement, not on price staying put, and it rewards you for being patient while nothing happens.
One-sided versus two-sided
All three shapes can be built two ways. Two-sided means your range straddles the current price, so you're holding both tokens across it, buying and selling as price moves in either direction. One-sided means your entire range sits on one side of the current price. Set your whole range below the current price using only the quote asset, USDG for example, and you hold nothing until price falls into your range, at which point it buys the coin for you as price drops, rung by rung. Set your whole range above the current price using only the coin, and it sells that coin back into quote as price rises into it. A one-sided position is effectively a limit order that pays you fees while it waits to fill, rather than sitting idle.
The rule of thumb
If you have no view on where price is headed and just want to earn while it's active, use Spot. If you expect the price to hold roughly still, a stable pair, a coin that's been range-bound for a while, use Curve, and accept that a real move against you converts a lot of your position fast. If you expect the price to travel, in either direction, and want to be paid more the further it goes, use Bid-Ask. And if you already have a specific level in mind, a price you'd be happy buying at or a price you'd be happy selling into, a one-sided position on that side of the market does the job on its own, without needing a two-sided range at all.
None of these are permanent choices. On DELTRA, moving from one shape or range to another means closing the position and opening a new one, so the shape you pick at the start is the one you're living with until you decide it's worth the gas to change it.
Module 2.6~15 min
Concentrated vs full range, and how LPs actually profit
This closes out the course by tying the range decision to the actual reason people LP: to end up ahead. There are two distinct ways that happens, and the second one is the less obvious of the two, so it gets a full worked example.
- In this topic
- decide between a concentrated range and a wider one for a given situation
- explain fees outearning impermanent loss as the first way LPs profit
- explain positive divergent loss as the second way, with a worked example
A tighter range earns more fees per dollar while price is inside it. A wider range earns less per dollar but stays inside for longer. Neither fact tells you which one to pick. That depends on how much attention you're planning to give the position and how much the coin is likely to move while you're not looking.
When to go concentrated
A concentrated range makes sense when you expect price to hold roughly still, and when you're checking on the position often enough to react if it doesn't. A stablecoin pair sitting near $1.00, a coin that's been range-bound for a stretch, a position you're planning to watch for a few hours and adjust: these are where a tight range earns its keep, because the odds of price leaving it before you notice are low.
When to go wider
A wider range makes sense whenever you can't watch the position closely, when the coin has a history of moving fast, or when the cost of rebuilding the position, gas on every bin, plus whatever you'd pay to swap back to your target mix, isn't worth paying every time price ticks outside a tight band. A position you're opening and leaving alone for a week or more should almost always be wider than one you're sitting in front of. The tradeoff is lower fee income per dollar while it's active, in exchange for staying active through a much bigger move.
The first way LPs profit: fees beating the drift
The mechanism most people already understand is this one: every trade that crosses your liquidity pays a fee, and if the fees you collect over the life of the position are bigger than the value you gave up to price moving against your original mix, you come out ahead. That's the whole calculation. A range that captures a lot of trading volume relative to how much it moves against you is a good bet. A range that earns thin fees while getting fully converted into the losing side of a big move is a bad one. Nothing exotic here, it's the same tradeoff covered earlier in this course, just restated as the plain question every position should answer: did fees outearn the drift.
The second way: positive divergent loss
A pool's mechanism doesn't just sell your winner and buy your loser as an abstract cost. It's reacting to whichever direction price moves, and that direction isn't something the pool decides. If price moves the way you wanted, that same mechanism becomes the thing that makes you money, on top of fees.
Say ETH is at $2,000 and you want to build a bigger position without timing the bottom. You deposit $1,000 into a two-sided range, split 0.25 ETH and $500 USDG. Price falls to $1,500 and stays there. Along the way, the position spends your USDG buying ETH at every price it passes through, ending up holding about 0.35 ETH. A single upfront buy of that same $500 at $2,000 would only have gotten you 0.25 more ETH, for 0.50 ETH total. Against a 50/50 holder, this looks like the standard impermanent loss from earlier in this course. But you were never trying to be a 50/50 holder, you wanted ETH bought cheaper over time, and that's exactly what happened, plus fees the whole way down.
The same works in reverse: if you'd rather end up holding more USDG, a position that sells your ETH into USDG as price rises is doing exactly what you wanted, and getting paid fees to do it. This is positive divergent loss: drift away from your original mix that the impermanent loss formula treats as a cost, working in your favor because it moved you toward the asset you actually wanted more of. It only works when you genuinely have a preference for one side. With no view, drift in either direction is just a cost, and you're back to needing fees to outearn it.
Check yourself before the next course
1. A coin has a 0.05% pool with $900,000 TVL and $9,000 of 24h fees, and a 1% pool with $1,200,000 TVL and $6,000 of 24h fees. Which pool is paying LPs more per dollar?
2. According to this lesson, when do fees offset impermanent loss?
3. A swap quote shows a good rate but a large price impact figure. What does that tell you?
4. You have a position that's done well and you want to take some profit without losing the fee income on the rest of it. What's the better move?
5. Price stays essentially flat for a week inside a Bid-Ask position's range. What happened to that position's fee income during the week?
6. What's the first, more familiar way an LP position ends up profitable?